BMT Nassau Street-Jamaica Line
Overview
The Broadway Elevated line is a study in contrasts. The line starts as the Nassau Street subway with a mixture of renovated, partially renovated, and unrenovated stations. The line then emerges to cross the Williamsburg Bridge and becomes the Brooklyn Broadway El. Here too the line shows the neglect of the years. The line features the oldest structure still in use in the subway with the S curve in the section from Alabama to Cypress Hills. Past the S curve the line has modern canopies and renovated mezzanines. After 121 Street, the line leaves Jamaica Avenue and reenters the subway via the new Archer Avenue tunnel (shared with the IND Queens Boulevard Line) to Jamaica Center. The original outer end of the line was elevated into Jamaica. It is said that the businesses who pushed for the demolition of the end of the Jamaica Ave. El lost a lot of business after the El was demolished. On Archer Avenue, the Broadway line uses the lower level which extends past the Jamaica Center Station and was to be a new line to southeast Queens. This extension project has not been undertaken to this date.
The Center Track East of Alabama Avenue
Reports have been conflicting on this issue but it seems most likely that center track was only installed in the following two locations: Between 111th St. and 116th St., and again between 160th and 168th Street on the outer end of the el. At 111th St. station, the center track, J4/J3, is still in place but in poor condition. It was formerly used as the turnback track for Lexington Avenue El trains (from 1917 until the mid-1940s) and then for a while as midday and weekend layup space. The 160-168th St. portion was also used for midday layovers.
The rest of the Jamaica Avenue branch was built with provision for a third track which was never installed. In 1958, a proposal was made to install a third track, eliminate the "S" curve at Crescent St. and extend the line directly down Jamaica Avenue to Broadway Junction. There would have been express stations at Woodhaven and Sutphin Boulevards. That proposal was shot down by locals who did not want more noise and less daylight. The alternative proposed was the Archer Avenue subway, which finally got (partially) built in the late '80's, to the everlasting regret of the merchants who had championed its construction. (Thanks to John Vigliotti for the above notes.)
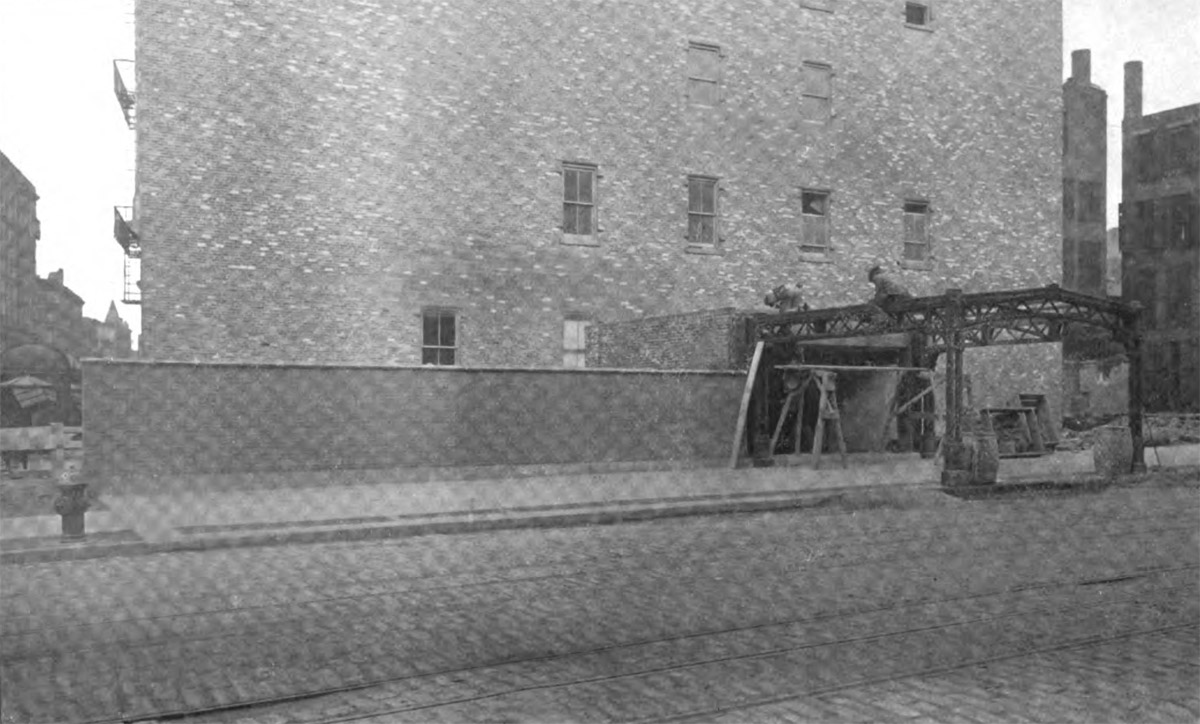
 Centre Street Subway. View showing stage of work on sinking foundations for Municipal Building, December 3, 1909. Completed work through Centre Street in distance. PSC report 1909. |
 Centre Street Subway. View at crossover 100 feet north of Pearl Street. PSC report 1909. |
 Centre Street Subway. Crossover at Broome Street. PSC report 1909. |
 Centre Street Subway. Centre and Walker Streets, east track of Canal Street Station on the left; two tracks deflecting to the right to Canal Street and the Manhattan Bridge. PSC report 1909. |
 Centre Street Subway. Portal and approach, Canal Street east of Bowery, looking west from the terminus of the Manhattan Bridge. PSC report 1909. |
 Centre Street Subway. Station entrance on private property, northwest corner of Canal Street. PSC report 1909. |
 Centre Street Subway. Canal Street Station, general view of platform and decorations. PSC report 1909. |
 Centre Street Subway. Canal Street Station, general view of platform and decorations. North end of west platform. PSC report 1909. |
 Centre Street Subway. Delancey Street, view of crossover and ventilating openings in roof west of Allen Street. PSC report 1909. |
 Centre Street Subway. Delancey Street, typical section showing structure and partition walls between tracks. PSC report 1909. |
 Centre Street Subway. Station entrance superstructure on Delancey Street, east of Bowery. PSC report 1910. |
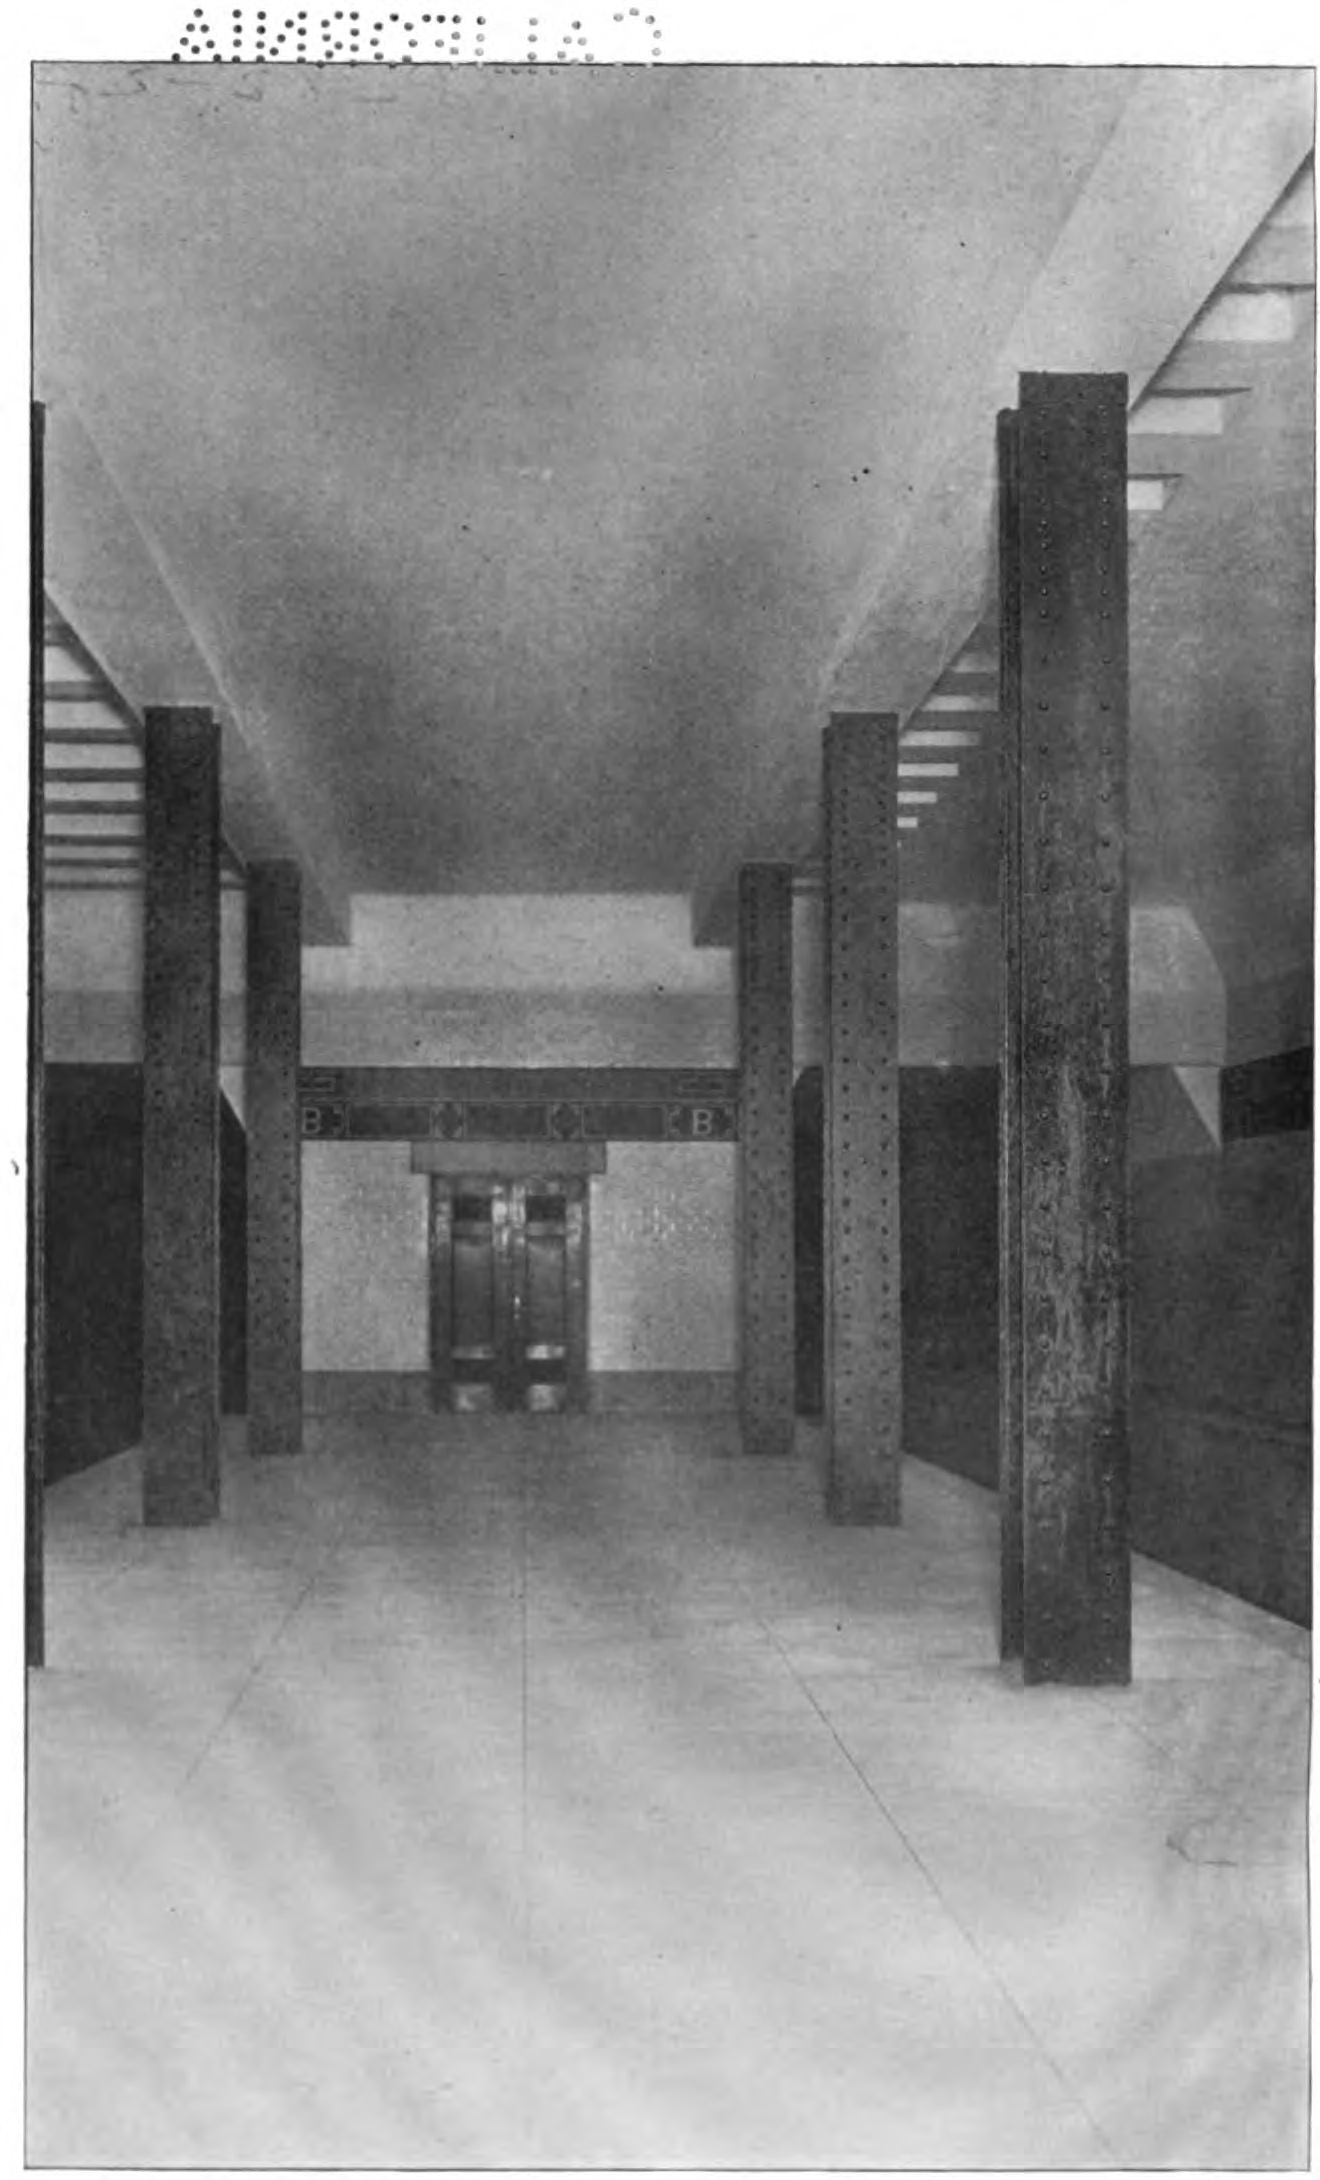 Centre Street Subway. Station at Bowery and Delancey Street, West End of North Platform, Showing the Two Northerly Tracks and Center Wall Between Tracks. PSC report 1910. |
 Centre Street Subway. Station at Bowery and Delancey Street, showing center wall between north and south platforms and decorative features. PSC report 1910. |
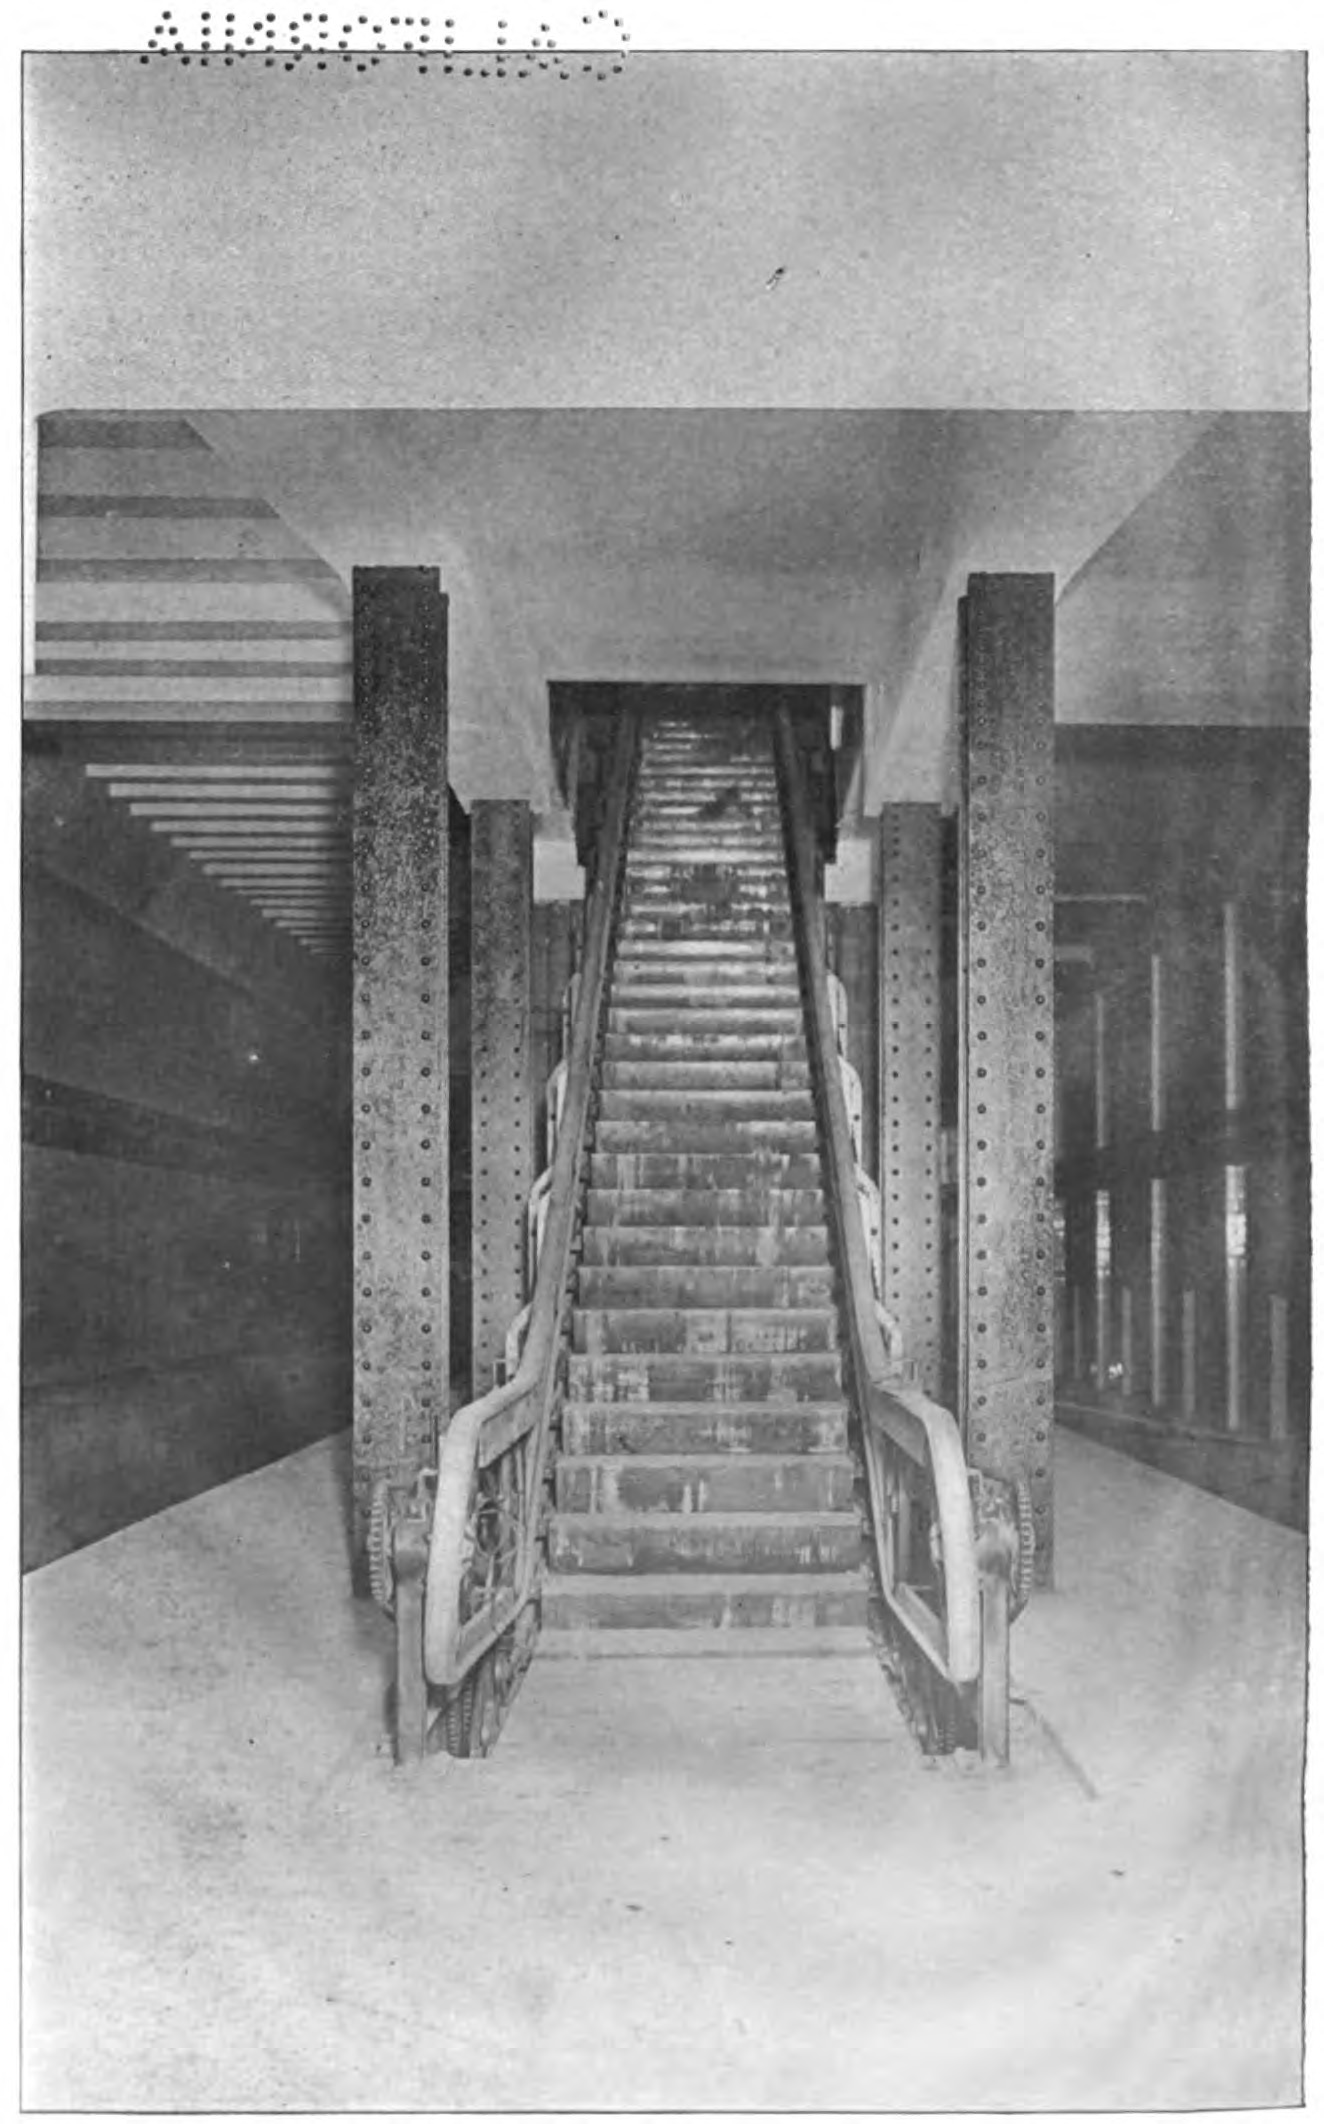 Centre Street Subway. Station at Bowery and Delancey Street, showing north escalator before placing of enclosure trim. PSC report 1910. |
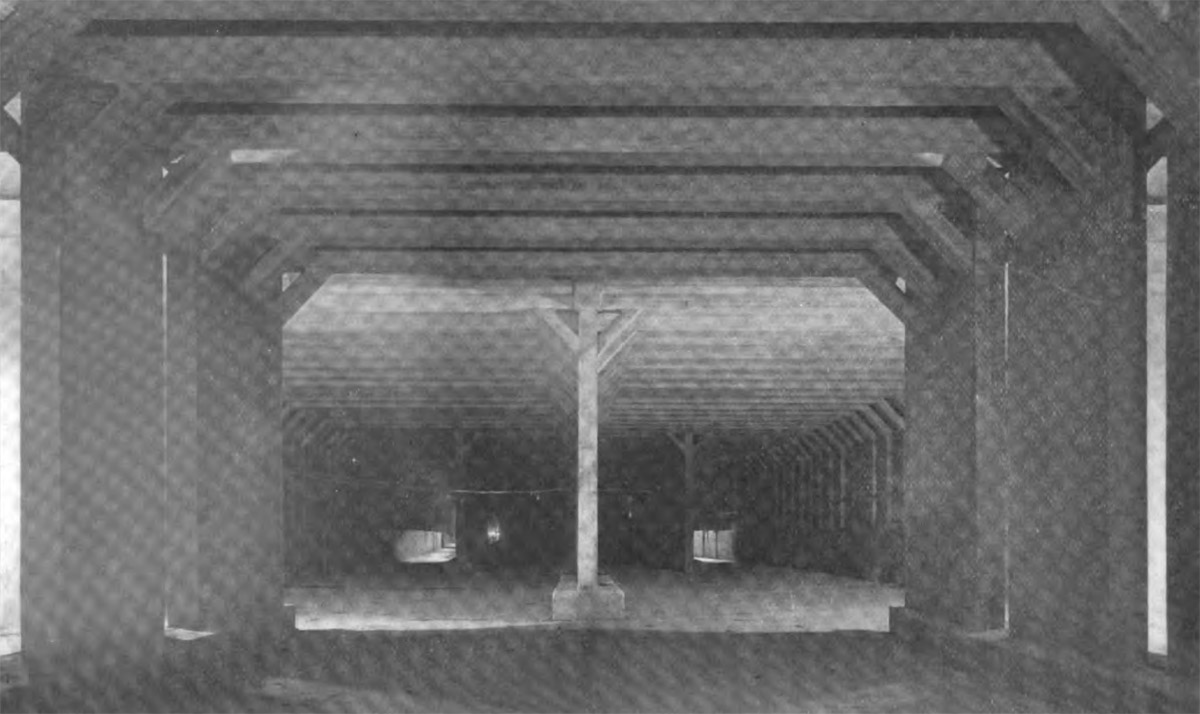
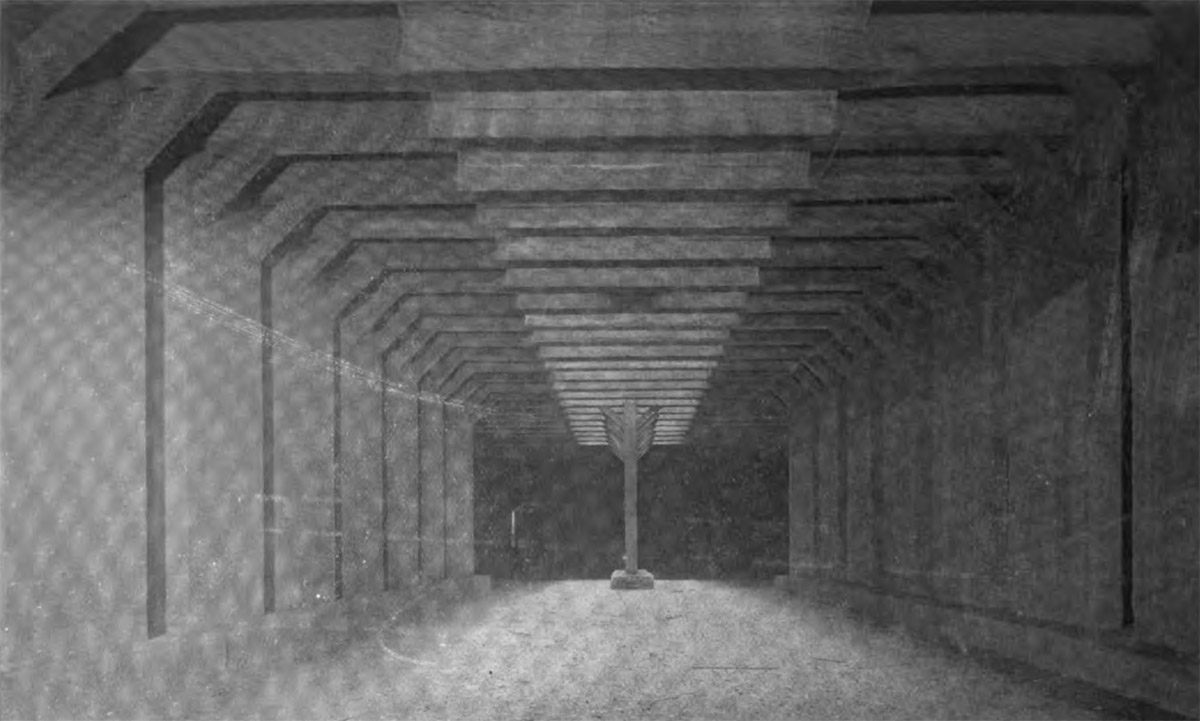
 Centre Street Subway. Method of Constructing Station Track Under Traffic By Use of Concrete Piers, Chambers Street Station. PSC report 1915. |
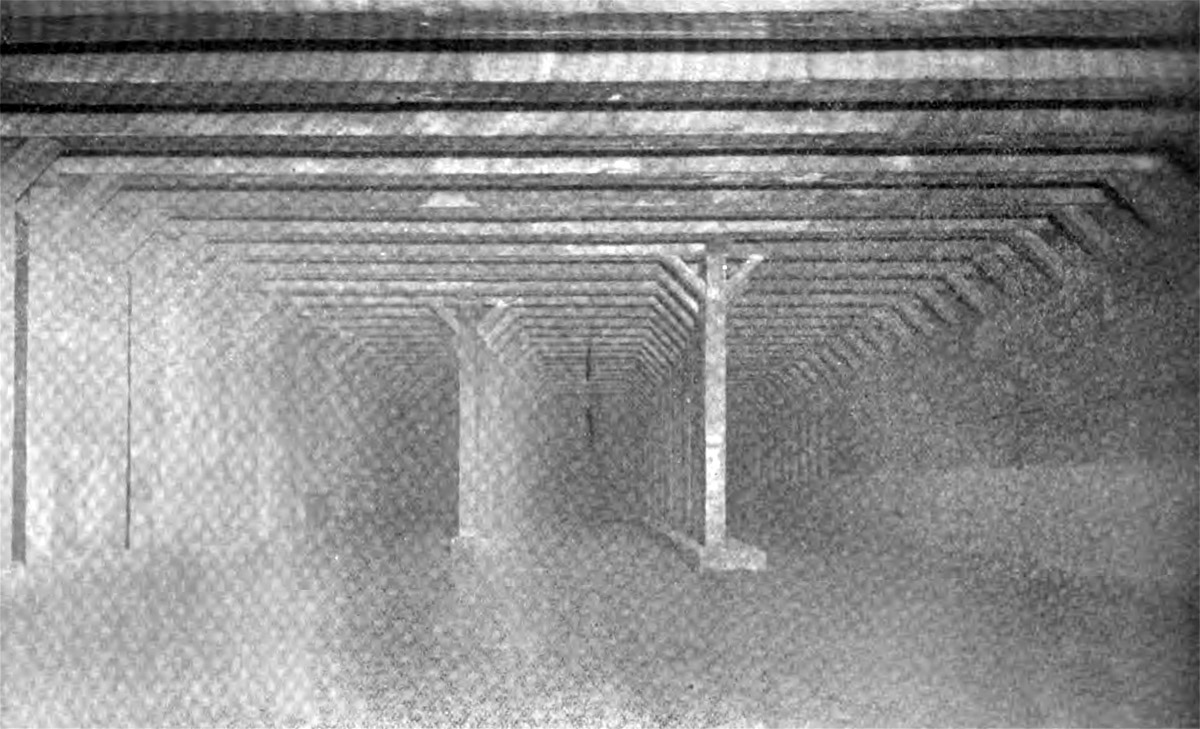
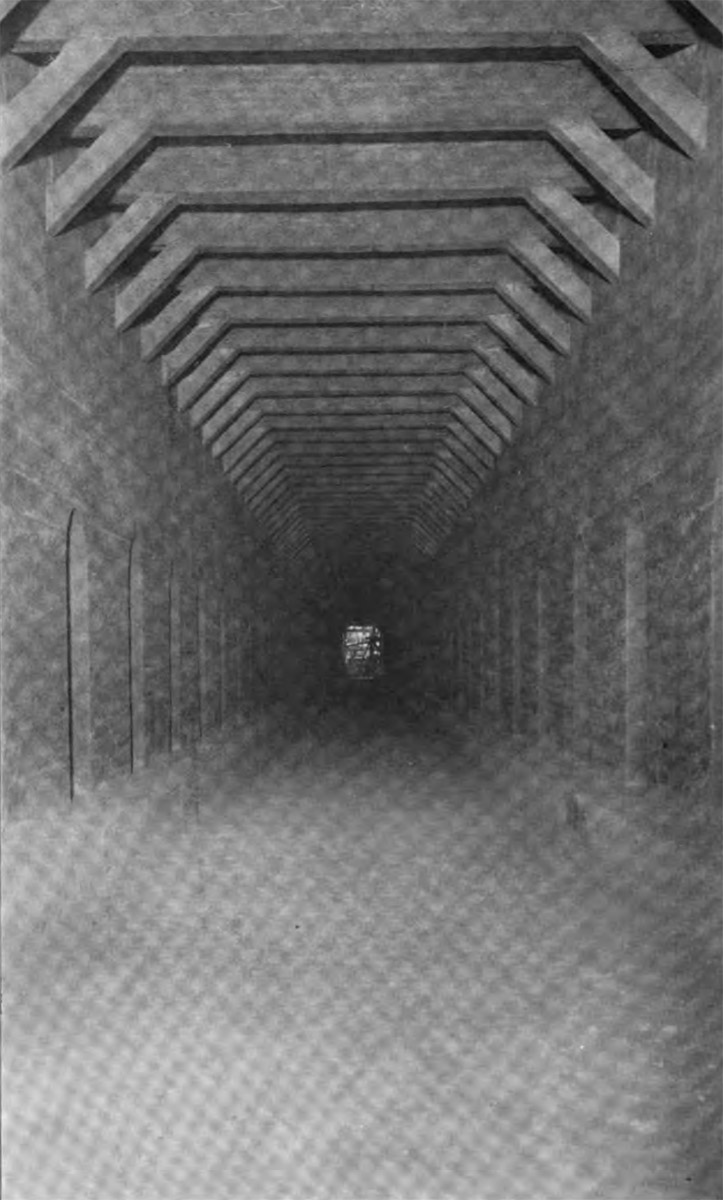
 Centre Street Subway. Special Manganese Steel Construction North of Chambers Street Station. PSC report 1915. |
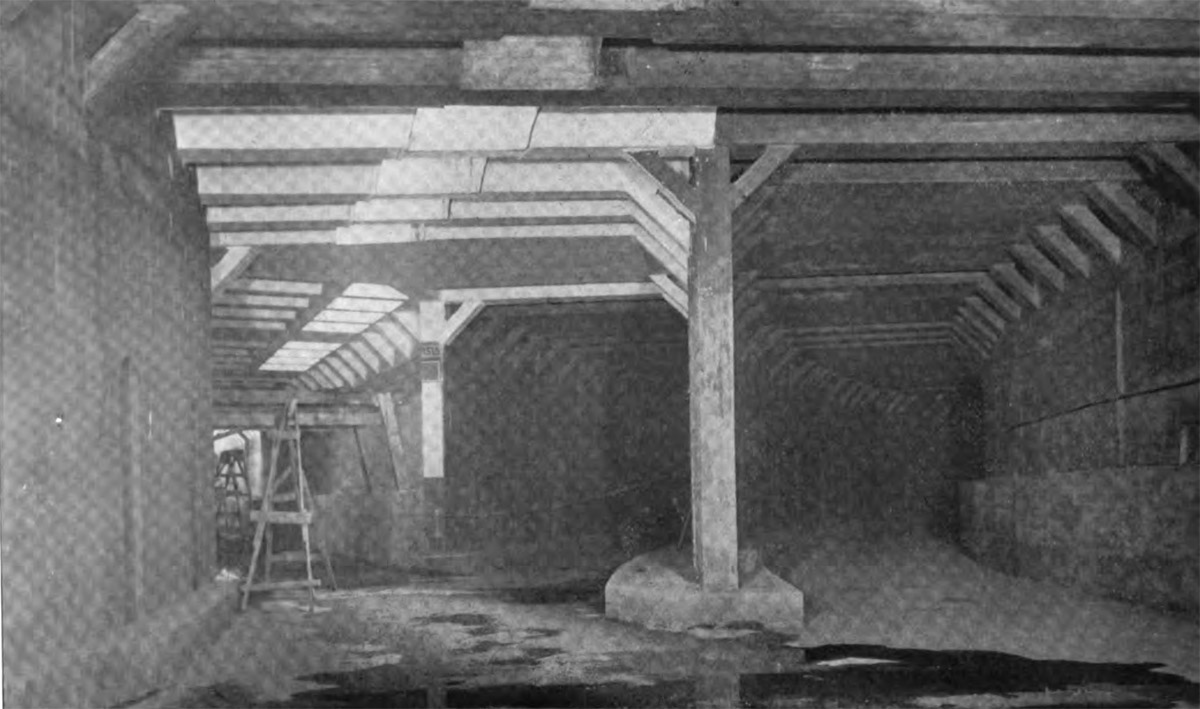
 Broadway Elevated Line, Brooklyn. Temporary Support of Tracks with Columns and Cross Girders Removed During Rebuilding. PSC report 1915. |
 Broadway Elevated Line. Forest Avenue Station, Lutheran Cemetery Line. PSC report 1915. |
Opening/Closing Dates
| Station | Opened | Closed |
|---|---|---|
| Broad Street | 11/26/1931 | |
| Fulton Street | 2/1/1933 | |
| Chambers Street | 3/14/1913 | |
| Canal Street | 3/14/1913 | |
| Bowery | 3/14/1913 | |
| Essex Street | 7/4/1908 | |
| Marcy Avenue | 6/25/1888 | |
| Hewes Street | 6/25/1888 | |
| Lorimer Street | 6/25/1888 | |
| Flushing Avenue | 6/25/1888 | |
| Myrtle Avenue/Broadway (Lower Level) | 6/25/1888 | |
| Broadway/Myrtle Ave (Upper Level) | 12/19/1889 | 10/4/1969 |
| Kosciuszko Street | 6/25/1888 | |
| Gates Avenue | 5/13/1885 | |
| Halsey Street | 8/19/1885 | |
| Chauncey Street | 7/18/1885 | |
| Broadway Junction | 6/14/1885 | |
| Alabama Avenue | 9/5/1885 | |
| Van Siclen Avenue | 12/3/1885 | |
| Cleveland Street | 5/30/1893 | |
| Norwood Avenue | 5/30/1893 | |
| Crescent Street | 5/30/1893 | |
| Cypress Hills | 5/30/1893 | |
| 75th Street-Elderts Lane | 5/28/1917 | |
| 85th Street-Forest Parkway | 5/28/1917 | |
| Woodhaven Boulevard | 5/28/1917 | |
| 102nd-104th Streets | 5/28/1917 | |
| 111th Street | 5/28/1917 | |
| 121st Street | 7/3/1918 | |
| Former Jamaica Elevated Stations | ||
| Metropolitan Avenue | 7/3/1918 | 4/15/1985 |
| Queens Boulevard | 7/3/1918 | 4/15/1985 |
| Sutphin Boulevard | 7/3/1918 | 9/10/1977 |
| 160th Street | 7/3/1918 | 9/10/1977 |
| 168th Street | 7/3/1918 | 9/10/1977 |
| Jamaica Subway | ||
| Sutphin Blvd.-Archer Ave.-JFK | 12/11/1988 | |
| Jamaica Center -- Parsons-Archer | 12/11/1988 | |
Station by Station
Broad Street
Artwork Sorry, no artwork here.
JZ Two tracks with two wide side platforms. This station has been renovated. The north fare control area is in the mezzanine, while the south fare control is at platform level. There is a closed exit from each platform at the southern end. A tower is at the south end of the southbound platform. The station has a name tablet and "B" in the mosaic band. The station features the standard Nassau Street Subway Grecian design border. A complex underground passageway exists outside the fare control which connects to the Wall Street station of the IRT East Side Line. This passageway also leads to Chase Manhattan Plaza and and the old Equitable Building.
 Collection of: Joe Testagrose |
 Photo by: Joe Testagrose |
 Photo by: Aliandro Brathwaite |
 Photo by: Phillip Lee |
 Photo by: Kevin Wong |
| More Images: 1-41 | ||||
Fulton Street
Artwork Sorry, no artwork here.
Transfer to IRT East Side Line, IRT West Side Line, IND 8th Avenue Line
JZ![]() Local station with two tracks and two side platforms, one each on two
levels, under Nassau Street from Beekman Street (north) to John Street
(south). The northbound track is on the lower level and the
southbound track on the upper level. The station is configured in this
way due to the narrow width of Nassau St. Mosaics here consist of a
name tablet and "F" mosaics along with the Grecian design border. This
station has been recently renovated. There are exits at Beekman
Street, Fulton Street, and John Street. There are stairways down to
the IND mezzanine, via which transfer can be made to the two IRT
stations.
Local station with two tracks and two side platforms, one each on two
levels, under Nassau Street from Beekman Street (north) to John Street
(south). The northbound track is on the lower level and the
southbound track on the upper level. The station is configured in this
way due to the narrow width of Nassau St. Mosaics here consist of a
name tablet and "F" mosaics along with the Grecian design border. This
station has been recently renovated. There are exits at Beekman
Street, Fulton Street, and John Street. There are stairways down to
the IND mezzanine, via which transfer can be made to the two IRT
stations.
The Fulton Street Transit Center is the MTA's marketing name for a new headhouse and updates to the transfer corridors at the four Fulton Street stations. Some relative depths of stations in the Fulton Street Transit Center complex are as follows, +/- 10 feet.
- IND Platforms: 60 feet
- IRT 2/3 Fulton Street: 50 feet
- BMT Northbound Fulton Street: 50 feet
- BMT Southbound Fulton Street: 20 feet
Artwork Astral Grating (Nancy Holt, 1987), Marine Grill Murals, 1913 (Frederick Dana Marsh, 2000)
 Photo by: Brian Weinberg |
 Photo by: Zach Summer |
 Photo by: John Barnes |
 Photo by: Zach Summer |
 Photo by: Anthony J. Liccese |
| More Images: 1-50 | ||||
Chambers Street
Artwork Sorry, no artwork here.
Transfer to IRT East Side Line
JZ![]() The Chambers Street station consists of four tracks, three island
platforms, and one remaining side platform (originally two). This
large station was used as a terminal station for various services from
the north and south via the Nassau Street Subway. As originally built
(1915), the north end of the station connected to the Williamsburg
Bridge and the Manhattan Bridge. Initially Chambers St. served as a
terminal station which explains some of its size and platform
complexity. In 1931, the Nassau Street subway loop was completed,
making Chambers St. a through station south to the Montague Street
tunnel to Brooklyn. It was about this time that the center platform
and the side platforms were closed as excessive. The west side
platform was walled up and partly destroyed when the IRT station was
rebuilt on the other side of the wall in 1960-1962. All of these areas
are still visible in plain sight from the open platforms. (See the
photos below.)
The Chambers Street station consists of four tracks, three island
platforms, and one remaining side platform (originally two). This
large station was used as a terminal station for various services from
the north and south via the Nassau Street Subway. As originally built
(1915), the north end of the station connected to the Williamsburg
Bridge and the Manhattan Bridge. Initially Chambers St. served as a
terminal station which explains some of its size and platform
complexity. In 1931, the Nassau Street subway loop was completed,
making Chambers St. a through station south to the Montague Street
tunnel to Brooklyn. It was about this time that the center platform
and the side platforms were closed as excessive. The west side
platform was walled up and partly destroyed when the IRT station was
rebuilt on the other side of the wall in 1960-1962. All of these areas
are still visible in plain sight from the open platforms. (See the
photos below.)
The Manhattan Bridge connection was severed in 1967 as part of the Chrystie Street construction project, which reduced the importance of and number of trains served at Chambers St. If the extra platforms weren't needed in 1931, they certainly weren't needed after 1967. Plans have been floated to reconfigure the station here and at Canal Street to reduce the line to two tracks with single island platforms serving them. For detail of the track configuration in this area, past and present, see the City Hall Area and Canal St. Area track maps. Single Line Diagram of the Chambers Street Station (PDF) (How to Read Single Line Diagrams)
Currently, only two of the three island platforms are in use. The "J" train uses the outer or "local" track on each of the open island platforms. The abandoned center island platform could serve trains in either direction. On weekends, the "J" service terminates here, and no trains continue south along Nassau Street. During this time, all trains use the southbound platform and cross over to the northbound track between Chambers St. and Canal St. stations. The lack of weekend service along Nassau St. is alleviated by transfers here to the IRT East Side/Lexington Avenue Brooklyn Bridge station, and further north at Canal St. to the BMT Broadway Subway.
(Thanks to Brennan's Guide to Disused Subway Stations for part of this description.)
 Photo by: Josh Lubchansky |
 Photo by: Michael Hodurski |
 Photo by: David Pirmann |
 Photo by: David Pirmann |
 Photo by: David Pirmann |
| More Images: 1-50 51-100 101-150 151-195 | ||||
Canal Street
Artwork Sorry, no artwork here.
Transfer to IRT East Side Line, BMT Broadway Line
JZ Two island platforms with two tracks in use, two stub-end tracks (which enter from the north) are disused. The platforms are joined at the southern end past the bumper blocks of the center stub-end tracks. There is also a crossover and crossunder between platforms. The wall tile has not been replaced and only the "Can" in the name tablet is showing. The "C" mosaics are still present as is the Grecian pattern. There are numerous closed exits. There is speculation that the track alignment at this station might be changed to use only the renovated northbound platform. For detail of the track configuration in this area see the Canal Street Area Track Map.
Some relative depths of stations in the Canal Street complex are as follows, +/- 10 feet.
- BMT Broadway platforms, 40 feet below street
- BMT bridge line platform, 50 feet
- Lexington Ave. subway platform, 20 feet
- Nassau St. subway platform, 20 feet
 Photo by: Christopher Sattler |
 Photo by: Christopher Sattler |
 Photo by: Christopher Sattler |
 Photo by: Doug Grotjahn |
 Photo by: David Pirmann |
| More Images: 1-41 | ||||
Bowery
Artwork Sorry, no artwork here.
JZ Four tracks, two island platforms. This depressing station is the least utilized of any Manhattan station. The station has a high ceiling at the north and south end. The J and M trains use only the local tracks, and when the M is running, the J skips this stop. There are two closed south exits which have been closed so long that there are no lights and are grilled off with two sets of floor to ceiling gates. Mosaics include the name tablet and a "B". The mezzanine has mosaics including "newsstand", "Women" and "Men" in raised letters. The newsstand and restrooms have long been closed. The mezzanine is reached via three flights of stairs or an escalator from the downtown platform. The station had a south mezzanine which is also long closed. A unique feature of the station is the arched wall niches at the north end rather than the standard rectangular niches. A route selector board was found here offering choices for J/M, D, and cancel. (the "D" on the route selector board was probably used for the short-lived "D" service via Essex St. while the Manhattan Bridge was under reconstruction.)
 Photo by: Roberto C. Tobar |
 Photo by: Clay Atcher |
 Photo by: Michael Hodurski |
 Photo by: Michael Hodurski |
 Photo by: Michael Hodurski |
| More Images: 1-50 51-66 | ||||
Essex Street
Artwork Shad Crossing (Ming Fay, 2004), Delancey Orchard (Ming Fay, 2004)
Transfer to IND 6th Avenue Line
JMZ Three tracks, a wall platform and an island platform. Trains to Jamaica use the "local" track of the island platform while trains to Broad St. The "express" track of the island platform sees occasional service during reroutes and construction but is otherwise unused. There is a crossunder between the two platforms. The wall platform has pictures of the Williamsburg Bridge being built along with a blue/gray "Essex Street" name tablet, and has bright blue accent tile on the wall. A tower is to the north end of the island platform. The fare control is located on the wall platform at platform level. The station has a partial curtain wall at the south end. Based on observations, the original station probably was the island platform and the wall platform and track probably added later. The old Essex St. Williamsburg Bridge trolley terminal is located to the south of the island platform's local track. The trolley terminal is used for signal storage. A track map of the area is available.
 Photo by: Adam Kaminsky |
 Photo by: Joe Testagrose |
 Photo by: Philip D'Allesandro |
 Photo by: Michael Hodurski |
 Photo by: Nicholas Noel |
| More Images: 1-50 51-66 | ||||
Williamsburg Bridge
Leaving Essex Street we approach the Williamsburg Bridge, which has two tracks in the center of the bridge. The bridge opened to elevated train and streetcar traffic in 1909. According to city engineers, the bridge is really three bridges in one: the bridge to Manhattan, the transit structure, and the bridge to Brooklyn. There is also an ADA compliant walkway. At the Brooklyn side, there is a long viaduct with S-curve into the Marcy Ave. station. Before arriving at Marcy, looking to the right, one can spot steelwork for the long-demolished Broadway Ferry spur. A tower is also at this location. Between May 1, 1999 and September 5, 1999, the bridge was closed to subway trains while the transit structure was demolished and totally rebuilt.
See Also The Bridge Builder's Triumph (Williamsburg Bridge) (1902). A 1902 article about the construction of the Williamsburg Bridge, which would become a vital rapid transit link between Manhattan and Brooklyn, carrying both streetcars and subway trains.
 Photo by: Stuart Gitlow |
 Collection of: Joe Testagrose |
 Photo by: John Barnes |
 Photo by: John Barnes |
 Photo by: Mark S. Feinman |
| More Images: 1-50 51-100 101-150 151-200 201-250 251-266 | ||||
Marcy Avenue
Artwork A Space Odyssey (Ellsworth Ausby, 2005)
JMZ![]() This station's configuration is three tracks, two side
platforms. During the summer of 1999, the station was temporarily
reconfigured to better accommodate changed service patterns due to the
Williamsburg Bridge reconstruction project. A central island platform
was erected over the center track with a footbridge over the eastbound
track. The eastbound fare control is being used for all passengers.
Under normal circumstances, Marcy Ave. station has fare control on
each platform and no crossover or crossunder between platforms. There
is low windscreen at the ends of the platforms. The platforms are very
narrow, especially at the ends. After the Williamsburg Bridge reopened
on September 5, 1999, the extra platform and station modifications
were removed.
This station's configuration is three tracks, two side
platforms. During the summer of 1999, the station was temporarily
reconfigured to better accommodate changed service patterns due to the
Williamsburg Bridge reconstruction project. A central island platform
was erected over the center track with a footbridge over the eastbound
track. The eastbound fare control is being used for all passengers.
Under normal circumstances, Marcy Ave. station has fare control on
each platform and no crossover or crossunder between platforms. There
is low windscreen at the ends of the platforms. The platforms are very
narrow, especially at the ends. After the Williamsburg Bridge reopened
on September 5, 1999, the extra platform and station modifications
were removed.
 Photo by: Doug Grotjahn |
 Photo by: Christopher Esposito |
 Photo by: Andrew Johnson |
 Photo by: Curtis Roach |
 Photo by: Joe Mirabella |
| More Images: 1-50 51-100 101-150 151-200 201-250 251-300 301-350 351-397 | ||||
Hewes Street
Artwork El in 16 Notes (Mara Held, 2002)
JM Three tracks, two side platforms. This station has non-standard horizontal windscreen rather than vertical windscreen in the center. The mezzanine is of wood with a concrete floor and has doors to the fare control and street. There is a crossunder between platforms here. The north mezzanine and exits from the platform have been long removed. The station is four stories above the street.
 Photo by: Joe Testagrose |
 Photo by: Zach Summer |
 Photo by: David Pirmann |
 Photo by: David Pirmann |
 Photo by: Brian Weinberg |
| More Images: 1-50 51-100 101-150 151-200 201-219 | ||||
Lorimer Street
Artwork Roundlet Series (Annette Davidek, 2002)
JM This station resembles Hewes St. Like at Hewes, an old north mezzanine was removed. The existing mezzanine is at the south end and there is a crossunder between platforms. This station also has an extra work stair near the south exit to a level above the mezzanine on the northbound side only.
 Photo by: Joe Testagrose |
 Photo by: Doug Grotjahn |
 Photo by: Joe Testagrose |
 Photo by: Aliandro Brathwaite |
 Photo by: Stewart Milstein |
| More Images: 1-50 51-100 101-137 | ||||
Flushing Avenue
Artwork Migrations (Robin Holder, 2006)
JM![]() This station also resembles Hewes St. with only a
south-end mezzanine and crossunder. The walls of the platform level at
the north end are vertical windscreen on the northbound side and
plywood on the southbound side.
This station also resembles Hewes St. with only a
south-end mezzanine and crossunder. The walls of the platform level at
the north end are vertical windscreen on the northbound side and
plywood on the southbound side.
 Photo by: Steve Zabel |
 Photo by: Peter Ehrlich |
 Photo by: John Dooley |
 Photo by: John Dooley |
 Photo by: John Dooley |
| More Images: 1-50 51-100 101-116 | ||||
Myrtle Avenue/Broadway
Artwork Jammin' Under the El (Verna Hart, 1999)
JMZ The Myrtle Avenue station consists of three tracks, with two island platforms. Above the in-use platforms, crossing at an angle, is another platform formerly served by the Myrtle Avenue Elevated, which ran south of here to Myrtle Ave. and Jay St, and north to Metropolitan Avenue. The southern portion of the line was closed in 1969 and the upper level station was abandoned.
The lower level mezzanine, along Broadway south of Myrtle, is one of the oldest in the system and provides access to both platforms. The Broadway mezzanine has stairs to the street on the northwest corner of the intersection. A second mezzanine on Myrtle Avenue, south of Broadway, is currently being rebuilt. In the past, this mezzanine had stairs from the street on both sides (east and west) of Myrtle Avenue on the south side of Broadway. It had one very long set of stairs that went directly up to the Myrtle Avenue El station, and a passage/platform that went under and up to both Jamaica line platforms.
 Photo by: Christopher Sattler |
 Photo by: David Pirmann |
 Photo by: Phillip Lee |
 Photo by: Filip Matuska |
 Photo by: John Barnes |
| More Images: 1-50 51-100 101-150 151-200 201-250 251-257 | ||||
Myrtle Avenue/Broadway Upper Level
The closed upper level had two tracks and one island platform, and stairways to both of the lower level platforms. The platform was used as a crossover for passengers after abandonment of the Myrtle El service but this has long been discontinued. A tower for the Myrtle El and junction was on the upper level but this too has been closed. A connection to the remaining portion of the Myrtle Ave. El branches off immediately east of the lower level platforms. For detail of the track configuration in this area see the Myrtle Avenue Area Track Map.
(Portions of the above description from Brennan's Guide to Disused Elevated Stations.)
 Photo by: Peter Dougherty |
 Collection of: David Pirmann |
 Collection of: David Pirmann |
 Photo by: Filip Matuska |
 Photo by: Brian J. Cudahy |
| More Images: 1-50 51-56 | ||||
Kosciuszko Street
Artwork Euphorbias (Ronald Calloway, 2002)
J Similar to Hewes and Lorimer Streets, this station has a closed south exit and mezzanine. Recently renovated.
 Photo by: Joe Testagrose |
 Photo by: Christopher Sattler |
 Photo by: Joe Testagrose |
 Photo by: Curtis Roach |
 Collection of: Joe Testagrose |
| More Images: 1-50 51 | ||||
Gates Avenue
Artwork Dream Train (Chris Robinson, 2002)
JZ Between Kosciuszko Street and the next station at Gates Ave., the line crosses Lexington Ave. where the remaining steelwork for the junction to the former Lexington Ave. El can be seen. Built in 1885, the Lexington Ave. line was the first el in Brooklyn. The section of el beginning here and continuing to Pennsylvania Avenue (three blocks east of Alabama Avenue Station) is also part of the original 1885 el route but was completely rebuilt as part of the Dual Contracts period of subway construction, 1916-1918.
Gates Avenue is similar to Hewes and Lorimer, this station has full windscreen and a closed north exit. The center windscreen is horizontal with some vertical windscreen at the ends. The mezzanine provides a crossunder between platforms.
 Photo by: Houser Collection |
 Photo by: Richard Panse |
 Photo by: John Dooley |
 Photo by: John Dooley |
 Photo by: David Pirmann |
| More Images: 1-50 51-61 | ||||
Halsey Street
Artwork Ancestral Letters in SOL'SCRYPT (SOL'SAX, 2007)
J This station also has a closed south exit and mezzanine. The center horizontal windscreen seems to be a different style than usual, resembling vinyl-clad metal. There is a crossunder.
 Photo by: Joe Testagrose |
 Photo by: Joe Testagrose |
 Photo by: Doug Grotjahn |
 Photo by: Robbie Rosenfeld |
 Photo by: John Dooley |
| More Images: 1-49 | ||||
Chauncey Street
Artwork El-Views (Maria Dominguez, 2002)
JZ This station also has the vinyl-clad windscreen on the northbound platform and standard windscreen on the southbound platform. There is a closed north exit and mezzanine. The mezzanine at the south end resembles Hewes Street, and provides a crossunder between platforms.
 Photo by: Christopher Sattler |
 Photo by: Peter Ehrlich |
 Collection of: George Conrad Collection |
 Collection of: George Conrad Collection |
 Collection of: David Pirmann |
| More Images: 1-50 51-62 | ||||
Broadway Junction
Artwork Brooklyn, New Morning (Al Loving, 2001)
Transfer to IND Fulton Street Line, BMT Canarsie Line
JZ The large station complex at Broadway Junction serves trains on the BMT Nassau Street-Jamaica Line (J, Z), and the BMT Canarsie Line (L). In the past there were also tracks and platforms serving The Fulton Street Elevated (Brooklyn). It is in fact the largest elevated complex in the system, with many artifacts remaining of its former glory, including ironwork for the old Fulton Street Elevated trackways which can be seen underneath and to the south of the current platforms.
Of the two remaining elevated stations at Broadway Junction, the lower level serving the Jamaica Line was built first (1884). It consists of three tracks and two island platforms.
The upper level, serving the Canarsie Line, was added in 1928. It connected the Canarsie Line subway from Manhattan with existing trackage built in 1906 for the Fulton Street Elevated. There are two tracks, one side platform (on the outbound side) and one island platform (used for the inbound side only). The Canarsie Line platforms must be one of the highest elevated platforms in the city, second only perhaps to Smith/9th Street, as it sits above the already-elevated Jamaica Line platforms. As high up as these platforms are, the tracks plunge abruptly into a tunnel at the north end. This end of the station slopes sharply downward, and it is less than 200 yards from the platform end to the tunnel's portal.
An interesting feature here is the mezzanine, which is above the Broadway line platforms. The upper mezzanine extends most of the length of the station and is made of concrete, resembling the style of the mezzanines on the #7 Flushing line. This mezzanine is used to connect to the BMT Canarsie Line and to exit to street level via two long escalators. To reach the inbound Canarsie Line platform, one must climb up a flight of stairs from the mezzanine to an overpass. The overpass was added during recent (2000's) renovations to the station complex and replaced a former dodgy underpass. This new crossover has steps that can be seen through, which gives the area a light, airy feel and makes them impossible to hide behind and underneath, a safety improvement. There is no direct access from the inbound Canarsie Line platform to the mezzanine or to the street.
A headhouse at street level contains the fare control and a transfer to the IND Fulton Street Line (subway). There is an old, "traditional" mezzanine, underneath the Jamaica Line platforms at the south end. It is currently used by various track maintenance operations as office space.
There is a track connections at each end of the Jamaica Line station to the East New York Yard, and also a connection south of the Canarsie Line station.
There are also tracks connecting the Canarsie Line and Jamaica Line here. Clearly noticable from the inbound Canarsie Line platforms is a flyover track, connecting inbound Canarsie Line to inbound Jamaica line. This track is rarely used, but now and then a train being rerouted will use these tracks, particularly during track work in the Canarsie Line tunnel. The outbound connection track can be seen emerging below the Canarsie Line platforms. For detail of the track configuration in this area see the East New York Area Track Map. A fine view of the yard can be had from the inbound Canarsie Line platform.
 Photo by: John Barnes |
 Photo by: Robert Mencher |
 Photo by: Robert Mencher |
 Photo by: Al Berner |
 Photo by: Jie Wen Li |
| More Images: 1-50 51-100 101-150 151-200 201-225 | ||||
Alabama Avenue
Artwork Untitled (Scott Redden, 2007)
J Leaving East New York, we view a trackway rising above the station. This trackway's purpose is not clear but was probably intended for future express service. A second level of platforms could have been built over the present platforms but this is all conjecture.
Alabama Avenue station has two tracks with one island platform. The exit is at the south end and has a wood mezzanine and concrete floor. The flyover trackway mentioned above ends just above this station's canopy at the south end. Alabama Avenue is typical of el construction of the time, i.e. entrances at one or both ends of the platform with fare control at platform level. This was also the case with the Myrtle Avenue branch between Broadway and Bridge-Jay Sts., and all the other stations on Fulton St., except Van Siclen which has a unique center mezzanine below track level.
 Photo by: Doug Grotjahn |
 Photo by: Robert Mencher |
 Photo by: John Dooley |
 Photo by: David-Paul Gerber |
 Photo by: Chris C. Shaffer |
| More Images: 1-50 51-97 | ||||
Van Siclen Avenue
Artwork The View From Here (Barbara Ellmann, 2007)
JZ Two tracks, one island platform. This station has a center exit with a wood floored mezzanine. At the north end there is an area under the tracks (possibly a closed mezzanine), now office space for the TA. The portion of the el from Pennsylania Avenue (3 blocks east of Alabama Avenue) to Van Siclen is unrebuilt, mostly cast iron el structure dating back to 1885, the oldest remaining transit structure in the city. Van Siclen was the terminal of the original el; remnants of a three-track terminal/turnback portion of el is visible just east of the station. The following section, from Van Siclen to Crescent Street, dates to 1893.
 Photo by: John Barnes |
 Photo by: Aliandro Brathwaite |
 Photo by: Roberto C. Tobar |
 Photo by: Robbie Rosenfeld |
 Collection of: David Pirmann |
| More Images: 1-40 | ||||
Cleveland Street
Artwork Las Flores (Amy Cheng, 2007)
J Two tracks, one narrow island platform. The fare control is squeezed in (there are only two turnstiles) at the north end of this narrow platform. The canopy over the platform is very small and only covers the area near the fare control.
 Photo by: Robert Pastore |
 Photo by: Robert Pastore |
 Photo by: Robert Pastore |
 Photo by: John Barnes |
 Photo by: David Pirmann |
| More Images: 1-37 | ||||
Norwood Avenue
Artwork Culture Swirl (Margaret Lanzetta, 2007)
JZ Two tracks, one island platform. This station resembles Cleveland St. but is slightly larger. The exit is at the north end, and has platform level fare control with three turnstiles. The floor is brick and the station house is metal. Fare control rails are of the IRT type, slightly fancier than the railings typically found in IND stations.
Departing Norwood Street, and just before arriving at the next station (Crescent Street), remains of a former connection to the LIRR can be seen at Chestnut Street. In the 1890s, the LIRR was looking for access to Manhattan and the BRT was looking for access to the Rockaways. The LIRR ran at grade on Atlantic Ave., one block south of the Jamaica El along Fulton Street. The two companies cooperated on a connection beginning in 1898, over which the LIRR ran service to Broadway Ferry and BRT ran service to the Rockaways via Woodhaven Junction. When the Williamsburg Bridge opened, the LIRR ran trains first to Essex St. and later all the way to Chambers St. This was the first direct access to the city for the LIRR. In 1917, a ruling against the joint operation by the USRA (the predecessor of the FRA) required the connection to be severed. Most of the junction's structure remained until the 1940s when the Atlantic Division of the LIRR was put underground and the connection structure was dismantled for the war effort. A photo from street level of these remains is below. For more information, see LIRRHistory.com.
 Photo by: John Barnes |
 Photo by: John Barnes |
 Photo by: Ed Davis, Sr. |
 Photo by: Roberto C. Tobar |
 Photo by: Nicholas Noel |
| More Images: 1-50 51-53 | ||||
Crescent Street
Artwork Wheel of Bloom; Soak up the Sun (Jung Hyang Kim, 2007)
JZ Two tracks, one island platform. This station also resembles Cleveland St. with a tiny island platform and platform level fare control at the north end. The floor is an unusual reddish brick. This is the last station on the 1893 section of the line.
 Photo by: Ed McKernan |
 Photo by: Doug Grotjahn |
 Photo by: Chris Reidy |
 Photo by: Emmanuel Robinson |
 Collection of: David Pirmann |
| More Images: 1-50 51-76 | ||||
Cypress Hills
Artwork Five Points of Observation (Kathleen McCarthy, 1990)
J We now approach a highlight of the line, the S curve, which has a timer controlled 10MPH speed limit. Once on the geographically north and south section there is a center storage track. Then we curve geographically east/west and approach our next stop, Cypress Hills. The S-curve is full of timed signals, forcing trains to make many signal stops for red signals. It is my opinion that this curve alone is the biggest bottleneck on the line. If it had been built, the flyover express bypassing the curve would have greatly improved this line.
Our line from here is once again consisting of wall platform and two tracks, but room on the structure exists for a third track. This portion of the line, from here to the original terminal at 168th Street, was constructed as part of the Dual Contracts, 1916-1918.
Cypress Hills station has two side platforms, two tracks, and one unused center trackway. There is a south exit to Hemlock and Crescent Streets with a steel mezzanine and a concrete floor with crossunder. The north exit is being closed off on the southbound platform but is still open on the northbound side. This is easily the worst station on this section of the line. I expect the balance of the north exit to close before too much longer.
 Photo by: Trevor Logan |
 Photo by: Richard Panse |
 Collection of: David Pirmann |
 Photo by: Peter Ehrlich |
 Photo by: John Barnes |
| More Images: 1-50 51-100 101-125 | ||||
75th Street-Elderts Lane
Artwork Five Points of Observation (Kathleen McCarthy, 1990)
JZ Two tracks, one unused center trackway, two side platforms. The dual names indicate the cross streets at the locations of the north and south exits. At present, only the northern exit at 75th St. remains. (The current map shows the name as 75th Street while station signs show both names, 75th St./Elderts Lane. Through 1966, this was known solely as Elderts Lane. Presumably, changes to the mezzanine configuration caused the station name changes.) There are doors to the fare control area which has a concrete floor and orange and cyan stripes on the walls and doors.
 Photo by: Doug Grotjahn |
 Collection of: David Pirmann |
 Photo by: Mike Scott |
 Photo by: Roberto C. Tobar |
 Photo by: David Pirmann |
| More Images: 1-45 | ||||
85th Street-Forest Parkway
Artwork Sorry, no artwork here.
J Similar to 75th St., the southern exit to Forest Parkway has been removed leaving the northern exit to 85th Street as the sole means of entry/exit. (The current map omits the Forest Pkwy. name shown on the station signage and just shows the name as 85th Street. Through 1966, this was known solely as Forest Parkway.) The exit at the north end provides a crossunder between directions.
 Photo by: Doug Grotjahn |
 Collection of: David Pirmann |
 Photo by: Roberto C. Tobar |
 Photo by: Chris Reidy |
 Photo by: Jie Wen Li |
| More Images: 1-23 | ||||
Woodhaven Boulevard
Artwork Five Points of Observation (Kathleen McCarthy, 1990)
JZ The station is physically located over Woodhaven Blvd. which is very wide with main and service roadways. The 95th Street exit (north exit) has a mezzanine while the south or main mezzanine leads to Woodhaven Boulevard and has red hex shaped paved block flooring and red walls. The station renovation has been completed and looks really sharp. There is a crossunder at both ends.
 Photo by: Joe Testagrose |
 Photo by: Bill E. |
 Photo by: Joe Grillo |
 Photo by: Robbie Rosenfeld |
 Photo by: Jie Wen Li |
| More Images: 1-50 51-68 | ||||
102nd-104th Streets
Artwork Five Points of Observation (Kathleen McCarthy, 1990)
JZ The south exit at 102nd St. is closed but the mezzanine and stairs to the street and platform are still present. The north exit at 104th St. has a clad wood mezzanine with concrete floor and windscreen halfway up the stairs from the platform. There is a crossunder. Through 1966, this was known solely as 102nd Street. After that time, the station had the dual name of 102-104th Sts., but the 102 portion of the name has recently been dropped from station signs. Again, changes to the mezzanine configuration caused the station name changes.
 Photo by: Roberto C. Tobar |
 Photo by: Frank Pfuhler |
 Photo by: Joe Grillo |
 Photo by: John Dooley |
 Photo by: Bernard Chatreau |
| More Images: 1-48 | ||||
111th Street
Artwork Five Points of Observation (Kathleen McCarthy, 1990)
J This station has had the north exit removed, but the stairways are used as signal equipment areas. Prior to the construction of the Archer Avenue Subway, this was the temporary end of the line while the old el was being demolished beyond 121st St.
 Photo by: Joe Testagrose |
 Photo by: Peter Ehrlich |
 Collection of: David Pirmann |
 Photo by: John Dooley |
 Photo by: John Dooley |
| More Images: 1-50 51-77 | ||||
121st Street
Artwork Sorry, no artwork here.
JZ This is the last station on Jamaica Avenue and last el stop. The north exit has a closed wood mezzanine with no cross under and is in very poor shape. The exit was a closed high exit to street. The south exit has a clad wood mezzanine with concrete paved floor. The south exit has windscreen on the lower portion and has a crossunder.
We now leave Jamaica Avenue and curve into the Archer Avenue tunnel. The Archer extension consists of two stations on the lower level of the line: Sutphin Boulevard and Jamaica Center (Parsons/Archer). These stations are discussed on the IND Queens Boulevard Line page.
 Photo by: Richard Panse |
 Photo by: Gary Chatterton |
 Photo by: Joe Testagrose |
 Photo by: Joe Testagrose |
 Photo by: Jie Wen Li |
| More Images: 1-50 51-87 | ||||
Station by Station (Former Jamaica Elevated Stations)
Metropolitan Avenue
Two side platforms, two tracks, unused center trackway. Closed in 1985 prior to the opening of the Archer Avenue subway extension in 1988.
 Photo by: Joe Testagrose |
 Collection of: Joe Testagrose |
 Photo by: Doug Grotjahn |
 Photo by: Thomas Lacker |
 Collection of: David Pirmann |
| More Images: 1-22 | ||||
Queens Boulevard
Two side platforms, two tracks, unused center trackway. Closed in 1985 prior to the opening of the Archer Avenue subway extension in 1988.
 Photo by: Doug Grotjahn |
 Photo by: Thomas Lacker |
 Photo by: Steve Zabel |
 Photo by: Stuart Gitlow |
 Photo by: Stuart Gitlow |
| More Images: 1-25 | ||||
Sutphin Boulevard
Two side platforms, two tracks, unused center trackway. Closed in 1977 prior to the opening of the Archer Avenue subway extension in 1988.
 Collection of: David Pirmann |
 Photo by: Steve Zabel |
 Collection of: David Pirmann |
 Photo by: Doug Grotjahn |
 Collection of: Joe Testagrose |
| More Images: 1-34 | ||||
160th Street
Two side platforms, three tracks. Closed in 1977 prior to the opening of the Archer Avenue subway extension in 1988.
 Collection of: Joe Testagrose |
 Photo by: Doug Grotjahn |
 Photo by: Frank Pfuhler |
 Collection of: Nicholas Fabrizio |
 Collection of: Nicholas Fabrizio |
| More Images: 1-24 | ||||
168th Street
One center platform, two tracks. Closed in 1977 prior to the opening of the Archer Avenue subway extension in 1988.
 Collection of: Joe Testagrose |
 Photo by: Joe Testagrose |
 Photo by: Joe Testagrose |
 Collection of: Nicholas Fabrizio |
 Collection of: Tim Zukas |
| More Images: 1-47 | ||||
Sources
Many photos, route descriptions, and details of the construction progress of the subway lines can be found in: Report of the Board of Rapid Transit Railroad Commissioners in the City of New York, for the year ending... 1901, 1902, 1903, 1904, 1905, 1906; and Report of the Public Service Commission for the First District of the State of New York, for the year ending... 1907, 1908, 1909, 1910, 1911, 1912, 1913, 1914, 1915, 1916, 1917, 1918, 1919, 1920.
Page Credits
By Peggy Darlington and David Pirmann.